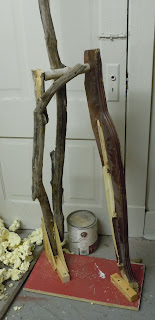
I want the construction process and the materials for these pieces to be obvious/deduce-able to people who look at them. Although there will be large areas of 'finished' surface, I want the chicken wire, lumber, driftwood, screws, twine, cloth, all of it, -where it can be seen. These pieces are about many things, one of them is pulling away surface/superficial illusions.
These are the bases/beginnings as they are being built. The image directly below is a big smiling face. The verdict is out if I will add eyes or not.
These are two different bases that are underway. What you see is what you get as far as they are just constructed from driftwood, scrap wood, plywood, screws, and fabric.
Here is the beginning of a head made out of a chicken wire frame, driftwood, and spray-foam. The spray-foam flows around the chicken wire which kind of locks everything into place (much like a ferro-concrete sculpture)
In fact, allow me to take a quick detour from this narcissistic diatribe and show you some actual ferro-concrete sculptures done by my former students in Advanced Sculpture at Northwest Missouri State University. The artists are: Catlin Scroggie, Katherine Byers, and Amanda Herzberg. Instead of spray foam they used cement, and instead of an armature of driftwood, they used steal rods (rebar).
This is Catlin's 'Foo Beast' as it was being hoisted out of the sculpture yard.
Katherine Byers piece as it is being positioned near the entrance to campus.
And Amanda Herzberg's 'Crane', located behind North/South Complex.
Now back to the nonsense at hand.
Taking a quick lesson from the Romans on using rubble concrete to fill the center of their columns, I am using 'rubble Styrofoam' to much the same effect. Ya see kids, Art History does pay off!
Once the Styrofoam hardens, I cover it with a layer of fabric and prime the heck out of it using a gallon of mistint paint (good quality paint if you don't mind the funky colors -which I don't). Here is a few more steps down the road with a mouth added.
I still have to build out the nose, brow line and such, but you get an idea where this one is going.
In an earlier post, I showed some images of the start of a Twinkie The Kid that I am building. Here are some shots of it as I add the foam layer.
I just let the foam sit overnight, and the next day it is firm enough to move around/flip over. It actually becomes pretty hard in less than a week.
Free-standing Twinkie! Then I put a layer of fabric (some old drapes left in my studio from its previous occupant) over the body in a manner similar to that goofy-looking head from earlier, and basically used an entire gallon to prime the fabric, -which is to primarily stiffen the fabric. Here is a start of the second layer of fabric.
Just last night I added the eyes, nose, and mouth.
Now it is time to start constructing a cowboy hat out of cardboard.....


No comments:
Post a Comment